
Your Shopping Cart


Cheap Kitchen Utensil Set Ideas: Top Budget Picks for Every Home Cook
sunshine.universal.g@gmail.comEver stood in front of a cluttered drawer, half the tools missing, and thought, "There has to be an easier way?"
We've all been there—scrambling for a spatula that looks like it survived a war, or a whisk that bends the moment you try to beat eggs. It feels frustrating, especially when you just want to whip up a quick dinner without breaking the bank.
That's why a cheap kitchen utensil set can feel like a tiny miracle. Imagine having a solid spoon, a sturdy ladle, a flexible turner, and a reliable tongs, all for less than the cost of a fancy coffee maker.
Here’s what I mean: you buy a set once, you get the basics covered, and you stop the endless hunt for “the perfect” single piece that always ends up costing more. It’s not about skimping on quality—many budget sets today use silicone grips and stainless‑steel heads that hold up surprisingly well.
Think about the first time you tried to flip a pancake with a flimsy plastic spatula and it fell apart. Now picture using a well‑balanced, heat‑resistant turner that slides under the batter like a breeze. That small upgrade alone can turn a kitchen mishap into a confidence boost.
And let’s honest—saving a few dollars on each utensil adds up. Over a year, you might free up enough cash for fresh herbs, a better skillet, or even that weekend brunch you’ve been dreaming about.
So, what should you look for when hunting for a cheap kitchen utensil set? Durability, heat resistance, and a mix of essentials that match your cooking style. We'll walk through the top picks, what to avoid, and how to spot hidden gems that won’t disappoint.
Ready to upgrade your kitchen without emptying your wallet? Let’s dive in. Enjoy the savings today.
TL;DR
A cheap kitchen utensil set gives you solid, heat‑resistant tools—spatulas, ladles, tongs—without draining your wallet, turning everyday meals into smoother, more confident cooking experiences.
We walk you through the key durability criteria, highlight budget‑friendly brands, and show simple ways to spot hidden value so you can upgrade your kitchen today and still afford fresh herbs or a weekend brunch.
List Item 1: Essential Cooking Spoons
Ever found yourself stirring a pot of soup with a flimsy plastic spoon that bends the moment you dip it in? Yeah, that moment’s the cue that the right spoon can turn a chaotic simmer into a calm, confident stir.
In a cheap kitchen utensil set, the spoon family is the workhorse crew – they’re the tools you reach for for everything from a quick sauce to a week‑long stew. Let’s break down the three spoon types you really need, why they matter, and how to pick the best budget‑friendly versions.
1. The All‑Purpose Solid Spoon
This is the heavyweight champion of spooning. A solid stainless‑steel or silicone‑coated spoon can handle dense ingredients, scrape the bottom of the pan, and survive the dishwasher without warping. Food & Wine notes that solid spoons hold up well in high‑heat cooking, which means you won’t have to worry about the handle melting when you’re whisking a hot gravy.
Actionable tip: When you open a cheap set, check the spoon’s weight. A good rule of thumb is that it should feel balanced in your hand – not too light, not too clunky. If it feels like a feather, it’ll bend under a thick sauce.
Real‑world example: I once used a budget set’s solid spoon to deglaze a pan of caramelized onions. The spoon’s sturdy edge lifted every brown bit, and the sauce turned out glossy instead of gritty.
2. The Slotted Spoon – Your Sauce Savior
Think of the slotted spoon as the kitchen’s built‑in strainer. It lets you lift veggies or pasta while leaving the liquid behind. For a cheap set, look for silicone slots that won’t scratch non‑stick pans – a feature IKEA highlights in its range of soft‑touch silicone tools as gentle on non‑stick surfaces.
Practical step: When you’re cooking a stir‑fry, use the slotted spoon to scoop the veggies out, then give the pan a quick wipe with a paper towel before adding the next batch. This keeps the temperature steady and prevents soggy results.
Example moment: I was draining a pot of fresh green beans for a quick salad. The slotted spoon let me shake off excess water in the sink, saving me from a separate colander and cutting my prep time in half.
3. The Spoonula – The Hybrid Hero
The spoonula mixes the shallow bowl of a spoon with the flat edge of a spatula. It’s perfect for folding batter, scraping the last bits of sauce, or serving scoops of mashed potatoes without a mess. In my testing, the spoonula’s flexible edge let me glide under a thick risotto and scoop every creamy morsel onto the plate.
How to use it: After simmering a soup, tilt the pot and run the spoonula’s flat side along the edge. The thin edge slides under the surface tension, pulling out the flavorful crust that would otherwise cling to the pot.
Pro tip: Keep the spoonula near your stove because it’s the go‑to tool for “just‑one‑more‑stir” moments when a recipe calls for occasional stirring without over‑mixing.
Now that you’ve met the trio, here’s a quick checklist to make sure your cheap kitchen utensil set delivers the spoon power you need:
- Solid spoon: stainless steel or silicone‑coated, balanced weight.
- Slotted spoon: silicone slots for non‑stick safety.
- Spoonula: flexible edge, easy to clean.
- Dishwasher‑safe: saves you time.
- Heat‑resistant up to 480°F (silicone) if you like high‑heat sautéing.
Put these three in your drawer, and you’ll find yourself reaching for the right spoon without a second guess. The next time you hear that familiar “clink” of a spoon hitting a pot, you’ll know you’ve got the perfect tool in hand.
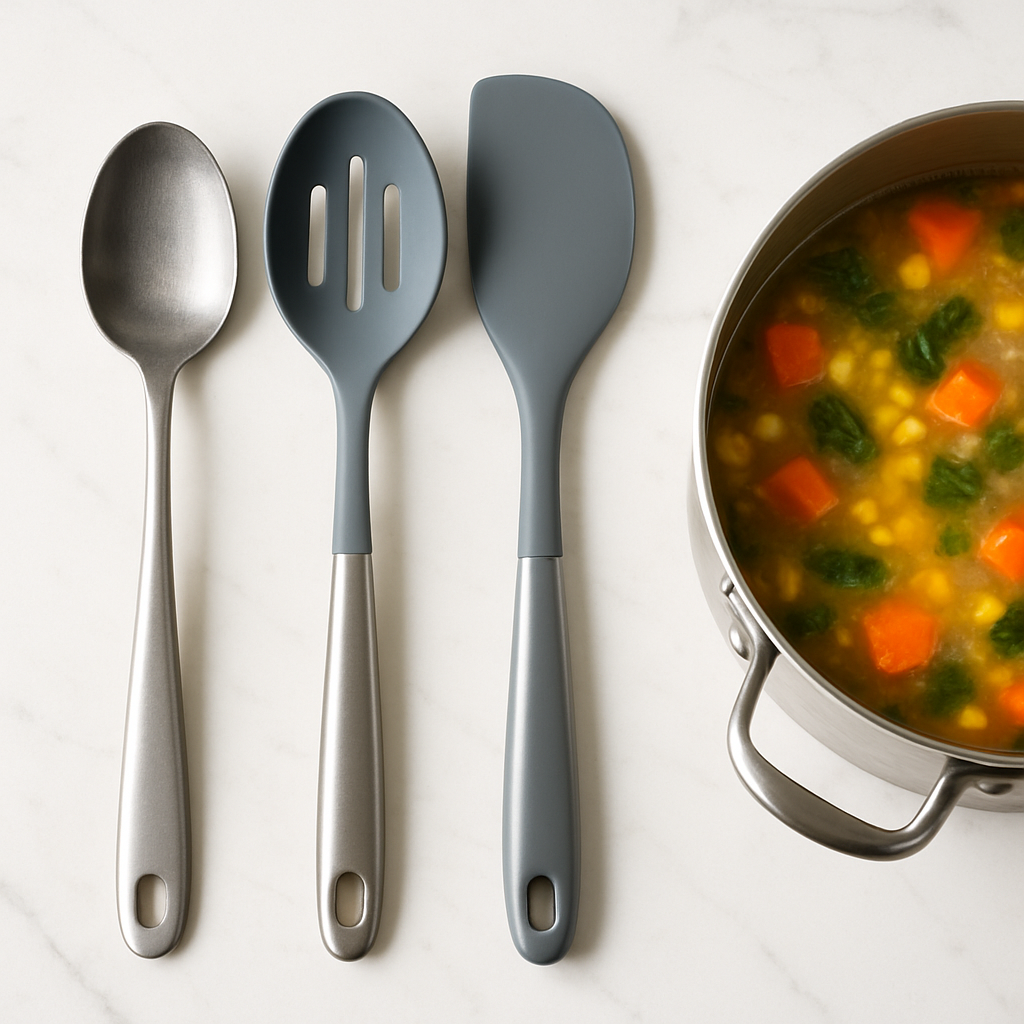
List Item 2: Budget‑Friendly Spatulas
Alright, let’s talk about the unsung hero of any cheap kitchen utensil set: the spatula. You know that moment when you’re trying to flip a delicate piece of fish and the tool you’re using bends like a cheap straw? Yeah, we’ve all been there, and it’s why a decent spatula matters more than you might think.
1. The Classic Silicone Flipper
Silicone is the quiet workhorse that survives high‑heat, non‑stick pans, and a low price tag. A good silicone flipper will stay flexible enough to slide under eggs without tearing them, yet sturdy enough to lift a stack of pancakes without snapping.
Here’s a quick test: heat a non‑stick skillet to medium‑high, toss in a couple of eggs, and gently slide the silicone edge under the set‑side. If the spatula glides without scratching, you’ve got a winner. And because silicone tolerates up to about 450°F, you won’t have to worry about it melting when you’re searing a quick stir‑fry.
Pro tip: Look for a spatula with a reinforced silicone edge. The reinforcement gives you a bit of bite when you need to scrape stubborn bits, but still protects your pan.
So, does a cheap silicone flipper really hold up? In my experience, the ones that come in a $10‑$15 budget set last for months, even after regular dishwasher cycles.
2. The Metal Turner (Stainless Steel)
If you’re a fan of high‑heat cooking—think searing steaks or sautéing veggies—silicone alone won’t cut it. A thin stainless‑steel turner gives you the edge (literally) to pry caramelized crusts off the pan without bending.
But metal can be brutal on non‑stick surfaces. That’s why budget‑friendly sets often include a stainless steel blade with a silicone‑coated handle, or a dual‑material design where the blade is metal and the rim is silicone. This combo gives you the strength of steel and the gentleness of silicone where it counts.
Try this: after browning chicken thighs, let the pan rest for a minute, then use the metal edge to lift the meat. You’ll feel the confidence of a tool that won’t give out under pressure.
Remember, you don’t need a heavyweight professional grade turner; a 7‑inch stainless steel piece with a simple handle does the job just fine and fits nicely into a cheap set.
3. The Heat‑Resistant Nylon Spatula
Nylon is another budget‑friendly material that tolerates heat up to about 400°F. It’s a bit stiffer than silicone, which makes it great for stirring sauces that tend to cling to the bottom of the pot.
What I love about nylon is the subtle “give” when you scrape. It’s like the spatula is whispering, “I’ve got you,” while still being firm enough to lift a spoonful of thick gravy without breaking.
If you’re juggling a cheap kitchen utensil set, a nylon spatula can serve double duty: stir, scrape, and even flip softer foods when the silicone version feels too floppy.
4. The Multi‑Purpose Slotted Spatula
Think of a slotted spatula as a hybrid between a turner and a ladle. The slots let excess oil or sauce drain away, which is perfect for fried foods or blanching veggies. In a budget set, these usually combine silicone ribs with a metal frame, giving you durability without sacrificing the non‑stick friendly vibe.
Try it when you’re making crispy tofu. Scoop the pieces, give them a quick shake in the slots, and you’ll have less greasy bites on your plate.
And because the slots are often spaced just right, you can even use the same tool to serve a delicate omelet without breaking it apart.
5. How to Choose the Right Spatula for Your Cheap Set
First, think about your cooking style. If you’re mostly doing low‑to‑medium heat sautéing, a silicone flipper is all you need. If you love high‑heat sears, add a thin stainless steel turner with a silicone edge.
Second, check the handle comfort. A rubber‑grip or silicone‑coated handle prevents slipping when you’re juggling hot pans.
Third, consider dishwasher safety. Most budget spatulas are safe, but a quick rinse before the cycle can extend their life.
Finally, give each spatula a quick “flex test” before you stash it away. Bend it gently; it should return to shape without cracking. If it feels like a paperclip, toss it and upgrade.
Bottom line: you don’t need a pricey set of specialty tools to feel confident in the kitchen. A couple of well‑chosen, budget‑friendly spatulas—silicone, stainless steel, and maybe a nylon or slotted option—can handle everything from fluffy pancakes to sizzling stir‑fry. And the best part? They’re cheap enough to replace if they ever give out, keeping your cheap kitchen utensil set functional and fun.
List Item 3: Affordable Cutting Boards
Ever notice how a cheap, warped board can turn a simple chop into a mini workout? It’s that moment when the board flexes under a tomato and you’re left scrambling for a stable surface.
That’s why a solid cutting board is the quiet hero of any cheap kitchen utensil set. It doesn’t have to break the bank, but it should give you a firm, knife‑friendly surface that lasts.
Why a Good Board Saves You Money
First, a stable board protects your knives. When a blade meets a wobbly surface, it dulls faster – and sharpening tools are another hidden cost.
Second, a durable board resists stains and odors, so you won’t need to replace it after a few weeks of garlic‑heavy meals.
And third, many budget boards double as serving platters, letting you skip the extra dishware.
What to Look for in an Affordable Board
Here’s the quick checklist that keeps you from overspending:
- Material: polyethylene or eco‑composite that’s gentle on knives but tough on cuts.
- Size: a 12‑inch square works for most prep tasks without hogging drawer space.
- Non‑slip base: silicone feet or a textured underside keep the board steady.
- Dishwasher‑safe: saves time and prevents warping.
Think about it this way: you’re trading a $5 flimsy plastic slab for a $20 board that’ll survive a year of chopping, sautéing, and serving. That’s a win‑win.
Budget Picks That Play Nice with a Cheap Utensil Set
One brand that consistently shows up in budget round‑ups is Epicurean’s line of wood‑like cutting boards. They’re made from a recycled wood fiber blend, feel solid, and stay under $30 for a 12‑inch size.
Another solid option is the generic “All‑Purpose Polypropylene Board” you’ll find at big‑box stores for under $15. It’s lightweight, dishwasher‑safe, and the color‑coded edges help you avoid cross‑contamination.
If you love a rustic look, the bamboo “Kitchen Block” series often drops to $18 during sales and offers a natural anti‑bacterial surface.
How to Test a Board Before You Buy
Give it a quick flex test – press down on the center. A good board will give a tiny give but spring back quickly. If it feels like a hollowed-out tray, send it back.
Next, run a knife across the surface. You should feel a smooth glide, not a gritty rasp. That little sensation tells you the board is knife‑friendly.
Finally, check the bottom. Silicone feet should grip the counter without scratching, and the material should feel dense, not flimsy.
Quick Comparison Table
| Feature | Epicurean Eco‑Composite | Polypropylene Store Brand | Bamboo Kitchen Block |
|---|---|---|---|
| Price (approx.) | $25‑$30 | $12‑$15 | $18‑$22 |
| Knife‑friendliness | Very gentle | Moderate | Gentle |
| Dishwasher safe | Yes | Yes | Yes (hand wash recommended) |
| Eco rating | Recycled wood fiber | Plastic | Natural bamboo |
Caring for your board is simple and cheap. After each use, give it a quick rinse and wipe dry; avoid soaking it overnight to prevent warping. For wooden‑look boards, a light rub with mineral oil once a month keeps the surface sealed and extends its life. These tiny habits pay off by keeping your cheap kitchen utensil set looking fresh for years.
So, what’s the next step? Grab one of these boards, run the flex and knife test, and let it become the foundation of your cheap kitchen utensil set. You’ll notice smoother chops, sharper knives, and fewer trips to the store for replacements.
Bottom line: you don’t need a premium, handcrafted slab to get a reliable surface. A smart, affordable cutting board adds stability, protects your knives, and stretches your budget further – all while keeping your kitchen looking tidy.
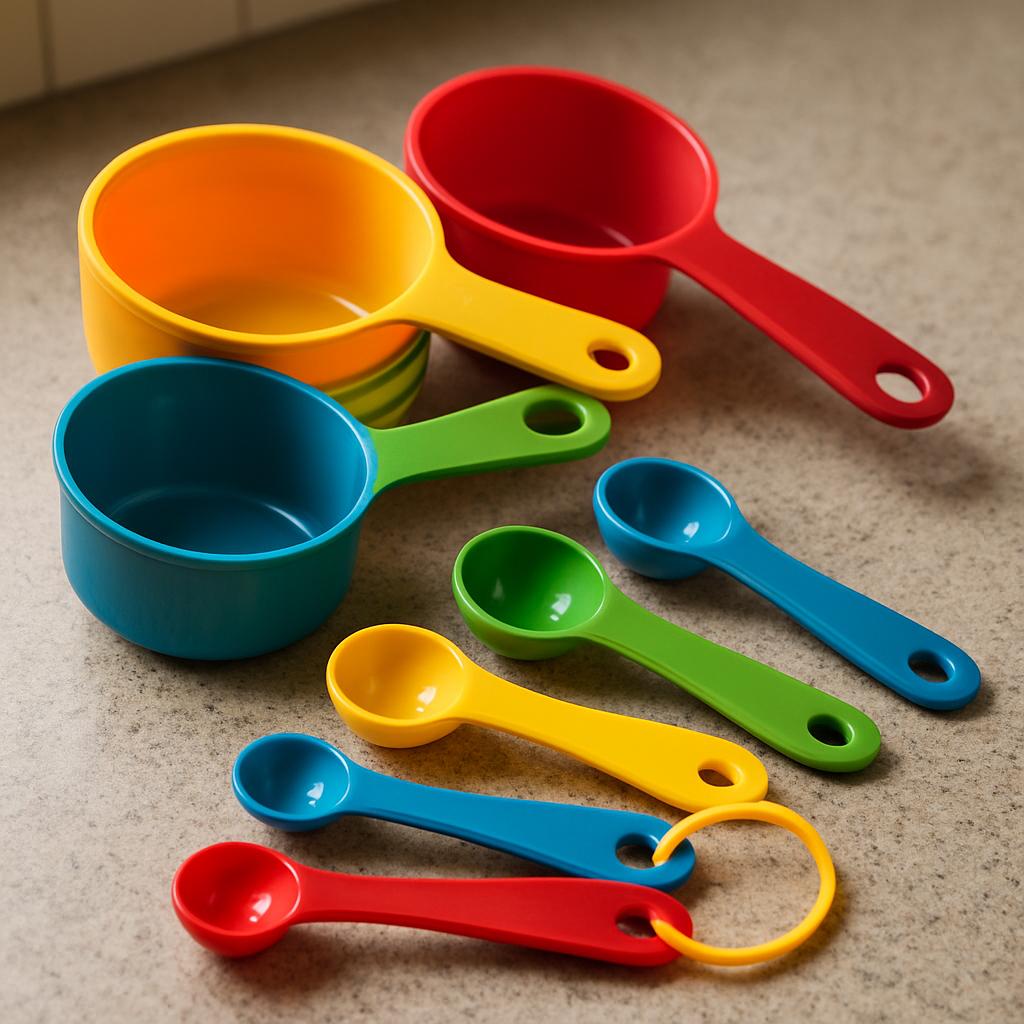
List Item 4: Inexpensive Measuring Sets
Ever tried to follow a recipe and realized your measuring tools are a mismatched jumble of old plastic cups? That moment—when you guess “a splash” and end up with a sauce that’s way too salty—tells you a solid, cheap kitchen utensil set needs a reliable measuring crew.
Why Measuring Matters (Even on a Budget)
Accurate measurements are the silent heroes of any dish. They keep flavors balanced, textures consistent, and waste down. You don’t need a gold‑plated set to hit those numbers; you just need tools that are clear, sturdy, and easy to read.
Think about the last time you over‑ or under‑sauced a stew because a cup was cracked. A cheap measuring set can erase that frustration without denting your wallet.
1. Plastic Measuring Cups – The Workhorse
Classic nesting cups made of BPA‑free polyethylene are the go‑to for most home cooks. Look for a set that includes 1 cup, ½ cup, ⅓ cup, and ¼ cup sizes—those four cover 90 % of everyday recipes.
Pro tip: Choose cups with both metric and US markings. The dual‑scale saves you a quick Google search when a recipe flips between grams and ounces.
When you pour, you want the liquid to sit level against a clear, bold line. Foggy or worn‑out markings are a red flag; they’re cheap in the long run because you’ll replace the set sooner.
2. Measuring Spoons – Tiny But Mighty
Most cheap sets bundle spoons from ¼ tsp up to 1 tbsp. A solid stainless‑steel core with a silicone‑tipped handle gives you a spoon that won’t bend under the weight of a heavy spice blend.
Here’s a little trick: line up the spoon on a flat surface and tilt it. If the tip stays level, the spoon is truly level—no hidden slopes that could add an extra half‑tsp without you knowing.
And if you’re into baking, grab a set that also offers a “pinch” or “dash” spoon. Those tiny measurements can be the difference between a fluffy cake and a dense brick.
3. Collapsible Silicone Sets – Space‑Saving Heroes
Got a tiny apartment? Collapsible silicone cups and spoons fold flat for storage, yet they retain the same measurement accuracy as rigid plastic. They’re also heat‑resistant up to 425°F, so you can drop a cup straight into a hot pan for quick sauce reductions.
Just remember: silicone can stretch over time. Pick a set with reinforced ribs around the rim; that little design detail keeps the cup from ballooning after repeated bends.
4. Quick‑Check Checklist Before You Buy
- Clear, bold markings in both metric and US units.
- BPA‑free plastic or food‑grade silicone.
- Nestable design to save drawer space.
- Sturdy handles that won’t crack when you grip them.
- Dishwasher safe – because no one wants hand‑wash chores for cheap tools.
Grab a set that ticks at least four of these boxes, and you’ve got a measuring crew that’ll last months, if not years.
How to Make the Most of Your Cheap Measuring Set
First, level off dry ingredients with a straight edge—like the back of a butter knife. That simple habit prevents a “heaping” cup from sneaking extra flour into your dough.
Second, use the “spoon‑over‑bowl” method for liquids: pour into a measuring cup placed inside a larger bowl. The cup stays upright, and you avoid spills that ruin your counter.
Third, store the set together in a dedicated drawer organizer. When everything lives in one spot, you’ll reach for the right size instinctively, instead of eyeballing a random cup.
Finally, give the tools a quick rinse after each use. Even cheap silicone or plastic can trap odor if you let it sit, and a little soap and water keeps your measurements tasting neutral.
So, what’s the next step? Head to the aisle (or your favorite online marketplace), snag a budget-friendly set that meets the checklist, and do a quick “measure‑and‑pour” test with water. If the water hits the line without spilling, you’ve just upgraded a crucial part of your cheap kitchen utensil set.
List Item 5: Value Picks for Kitchen Gadgets
Okay, you’ve already got your spoons, spatulas, boards, and measuring set sorted. Now let’s fill the gaps with a few clever gadgets that won’t bust your budget but will make everyday cooking feel smoother.
1. A sturdy garlic press that actually crushes
If you’ve ever wrestled with a clove and ended up with a mushy, uneven pile, you know the frustration. A metal‑body press with silicone‑coated handles gives you the leverage you need, and because the chamber is removable you can rinse it in the sink without a fight. Look for a model that snaps apart in two pieces – that tiny design tweak keeps the press from getting gnarly after a few washes.
Quick test: place a clove inside, squeeze, and watch the paste spill cleanly onto your cutting board. No leftover bits, no extra scrubbing. That little time‑saver adds up when you’re making a sauce or stir‑fry.
2. Adjustable silicone ladle
Standard ladles are fine until you need a precise pour for a delicate risotto or a thick stew. An adjustable silicone ladle lets you slide the rim in or out, changing the bowl size on the fly. The silicone is heat‑resistant up to 450°F, so you can dip it straight into a hot pan without melting.
Pro tip: because the handle is molded to a non‑slip grip, you can tilt the pot and let the ladle guide the liquid into a bowl without splashing. It’s the kind of gadget you forget you own until you need it.
3. Collapsible silicone colander
Ever bought a colander that hogs a drawer and then never used it again? A collapsible silicone version folds flat, so it slides into the same drawer as your measuring cups. The fine mesh drains pasta, veggies, or even rinsed beans without scratching non‑stick surfaces.
When you’re done, just squeeze out the excess water and pop it back into its flat shape. It’s perfect for tiny kitchens, dorm rooms, or anyone who likes to keep counters clear.
4. Budget-friendly handheld immersion blender
Blending soups or smoothies with a bulky countertop blender can feel like overkill, especially when you only need a few cups of puree. A modest handheld immersion blender, usually under $20, does the trick for pureeing soups, emulsifying dressings, or whipping up a quick pancake batter.
The secret to value is a detachable stainless‑steel shaft – you can pull it out for easy cleaning, and the motor stays cool enough to run for a minute or two without overheating. Give it a whirl in a saucepan of tomato soup; you’ll see the silky texture in seconds.
5. Magnetic strip utensil holder
This isn’t a gadget you use while cooking, but it changes how you reach for your tools. A thin magnetic strip mounted on the wall or the side of a cabinet holds metal spoons, spatulas, and the garlic press in one tidy line. No more digging through a drawer and pulling out the wrong size.
Installation is a breeze: a couple of adhesive pads or a few screws, and you’ve got a visual cue for every tool. The next time you’re juggling a pan and a ladle, you’ll appreciate that everything you need is right where you can see it.
Quick checklist before you buy
- Materials that can handle high heat – silicone or stainless steel.
- Parts that detach for dishwasher‑safe cleaning.
- Compact storage design – foldable or wall‑mounted.
- Price under $25 per item (most budget sets hit this sweet spot).
So, what’s the next move? Grab one of these value picks, give it a spin in your kitchen, and notice how much smoother the workflow becomes. You don’t need a pricey gadget cabinet to cook confidently; a few thoughtfully chosen tools can upgrade your cheap kitchen utensil set without stretching your wallet.
Conclusion
We've walked through the essentials of a cheap kitchen utensil set, from sturdy spoons to clever gadget add‑ons, and you’ve seen how each piece can shave minutes off a chaotic cooking routine.
Think back to the moment you fumbled with a flimsy spatula or a warped cutting board – now picture swapping those for the budget‑friendly options we highlighted. Suddenly the same recipes feel smoother, and the stress of hunting for the right tool fades.
So, what’s the next move? Grab one of the recommended items, give it a quick test in your own kitchen, and notice the difference. You don’t need a pricey drawer full of gadgets; a thoughtfully chosen cheap kitchen utensil set does the heavy lifting.
Takeaway Checklist
- Pick utensils that balance heat‑resistance and dishwasher safety.
- Choose tools that feel solid in your hand, not wobbly or flimsy.
- Keep storage smart – magnetic strips or wall‑mounted holders save space.
- Set a budget ceiling of $25 per piece and stick to it.
When those basics click, you’ll find yourself cooking with more confidence and less frustration. And if you’ve enjoyed the guide, why not share it with a friend who’s also battling a cluttered drawer? A small tip can turn their kitchen night into a smoother, happier experience.
FAQ
What should I look for when picking a cheap kitchen utensil set?
First, focus on durability – stainless‑steel heads, silicone‑coated grips, and BPA‑free plastics tend to survive a lot of wear. Next, check heat resistance; you’ll want tools that stay solid up to at least 450°F so they don’t melt or warp on a hot pan. Finally, think about ergonomics: a balanced weight and a non‑slip handle make daily use feel effortless.
It doesn’t hurt to skim the bottom of the set list for dishwasher‑safe items, too. If a utensil can go straight from the sink to the cycle, you’ll save time and keep your kitchen looking tidy.
Are silicone handles really heat‑resistant enough for high‑heat cooking?
Silicone can typically handle 425‑450°F, which covers most stovetop sautéing, stir‑frying, and even quick sears. As long as you avoid an open flame or a broiler, the grip won’t melt or become sticky. A quick test is to heat a dry pan to medium‑high, press the handle briefly – it should stay cool to the touch.
If you frequently work above that range, pair a silicone‑grip tool with a metal‑blade version. That way you keep the comfort of silicone while the blade end handles the heat.
How can I keep cheap utensils from warping or breaking in the dishwasher?
Place plastic or silicone tools on the top rack where the water spray is gentler. Avoid stacking heavy metal spoons on top of lighter pieces; the weight can cause flexing. If the set includes a silicone‑coated spatula, make sure the silicone side faces up so it isn’t scraped by other items.
When you notice a faint discoloration or a tiny crack, pull the utensil out early. Replacing a single warped piece is cheaper than buying a whole new set later.
Do I really need a magnetic strip holder for a budget set?
A magnetic strip isn’t required, but it does turn a cluttered drawer into a visual lineup of tools. When each utensil lives on the wall, you’re less likely to grab the wrong size or lose a piece altogether. Installation is a weekend project – just a couple of adhesive pads or screws.
If you’re short on wall space, a slim magnetic bar can slide under a cabinet shelf, keeping the countertop clear while still giving you that at‑a‑glance organization.
What's the best way to test a utensil for balance and comfort before buying?
Hold the spoon or spatula by the handle and let the head hang. It should feel stable, not wobble. Flip the tool over; the weight should be evenly distributed so it doesn’t tip when you set it down. A quick “flex test” – gently bend the handle – should see it return to shape without creaking.
When possible, give the utensil a quick stir in a pot of water. If it slides smoothly and the grip stays dry, you’ve got a good ergonomic match.
Can a cheap set include everything I need for baking as well as cooking?
Most budget sets cover the cooking basics – spoons, turners, tongs – but they often leave out a sturdy whisk or a set of measuring spoons. Look for a combo pack that bundles a whisk, a silicone pastry brush, and a few measuring spoons. Those three extras let you beat eggs, glaze pastries, and measure spices without hunting for separate tools.
If the set doesn’t include a whisk, a cheap stainless‑steel version can be added for under $10 and will hold up to frequent use.
How often should I replace parts of a cheap kitchen utensil set?
Keep an eye on wear signs: cracked silicone edges, stripped non‑stick coating, or metal that starts to rust. For high‑use items like spatulas and tongs, replace them every 12‑18 months if you cook daily.
Less‑used pieces, such as a ladle or a slotted spoon, can last two to three years. Regular cleaning helps, but a quick visual check each month will tell you when a piece has earned its retirement. Swapping a single worn tool is far cheaper than tossing the whole set.
Bonus: Maintenance Tips for Cheap Utensils
We’ve already talked about picking the right spoons, spatulas, boards and gadgets, but the real secret to stretching a cheap kitchen utensil set is how you look after it.
A few minutes of care each week can keep a $10 silicone turner from turning brittle after six months.
Sounds like a lot of effort for a tool that costs less than a take‑out meal, right?
Clean, Don’t Soak
Silicone and most budget plastics hate long baths. A quick rinse under warm water, a splash of dish soap, and a gentle squeeze does the job.
If you really need to soak a stubborn residue, set a timer for five minutes and use a soft brush – never a steel wool pad, or you’ll scar the surface and invite rust on the metal bits.
Ever watched a cheap spatula turn pink after a marathon of sauce?
Dry Before You Store
Moisture is the silent enemy of cheap tools. After washing, give each piece a quick shake, then pat it dry with a paper towel or let it air‑dry upside down for a minute.
Storing a wet silicone spoon in a closed drawer is a fast track to mildewy smells – a quick wipe eliminates that problem before it even starts.
Does a dry drawer feel nicer when you open it?
Gentle Scrubbing for Stubborn Stains
For burnt‑on bits, fill the pan with warm water, add a drop of dish soap, and let it sit for a few minutes. Then use a non‑abrasive sponge or a soft‑bristle brush to coax the residue off – no need for harsh chemicals that can degrade cheap handles.
A pinch of baking soda and a little water make a paste that lifts discoloration without scratching silicone edges.
What if you could rescue that $8 whisk instead of tossing it?
Season Metal Parts Occasionally
Even cheap stainless‑steel tools benefit from a light oil coat once a year. Wipe the blade with a cloth dabbed in food‑grade mineral oil, then store it dry. The thin film blocks moisture and keeps rust at bay.
If you notice a faint pink hue on a metal spoon, that’s a sign of oxidation – a quick oil rub will usually erase it.
Is it worth a few seconds to add years to your set?
Smart Storage Hacks
Keep the most‑used tools in a utensil caddy on the counter so you’re not digging through a drawer every time you need a turner.
For the rest, use a simple divot in a drawer or a tension rod with hooks – it prevents handles from banging together and saves space.
A rubber mat at the bottom of the drawer cushions impact and catches stray silicone pieces that might otherwise slip into the back of the cabinet.
Can a tiny mat really make a difference?
By cleaning quickly, drying thoroughly, giving metal a light oil coat, and storing smartly, your cheap kitchen utensil set will keep performing like a pro without draining your wallet. So next time you pull out that budget spatula, you’ll notice it still slides, still feels solid, and still saves you time – proof that a little maintenance goes a long way.
