
Your Shopping Cart


Affordable Stainless Steel Electric Egg Cooker: A Practical Buying Guide
sunshine.universal.g@gmail.comEver stared at a half‑cooked egg and thought, "There’s got to be an easier way?"
You’re not alone – we’ve all fumbled with timers, boiled water, and the dreaded rubbery whites.
That’s why the affordable stainless steel electric egg cooker feels like a tiny kitchen miracle.
Imagine popping a few eggs in, pressing a single button, and walking away while the device does the math.
No more guessing if you need six minutes for soft‑boiled or twelve for hard‑boiled – it adjusts automatically.
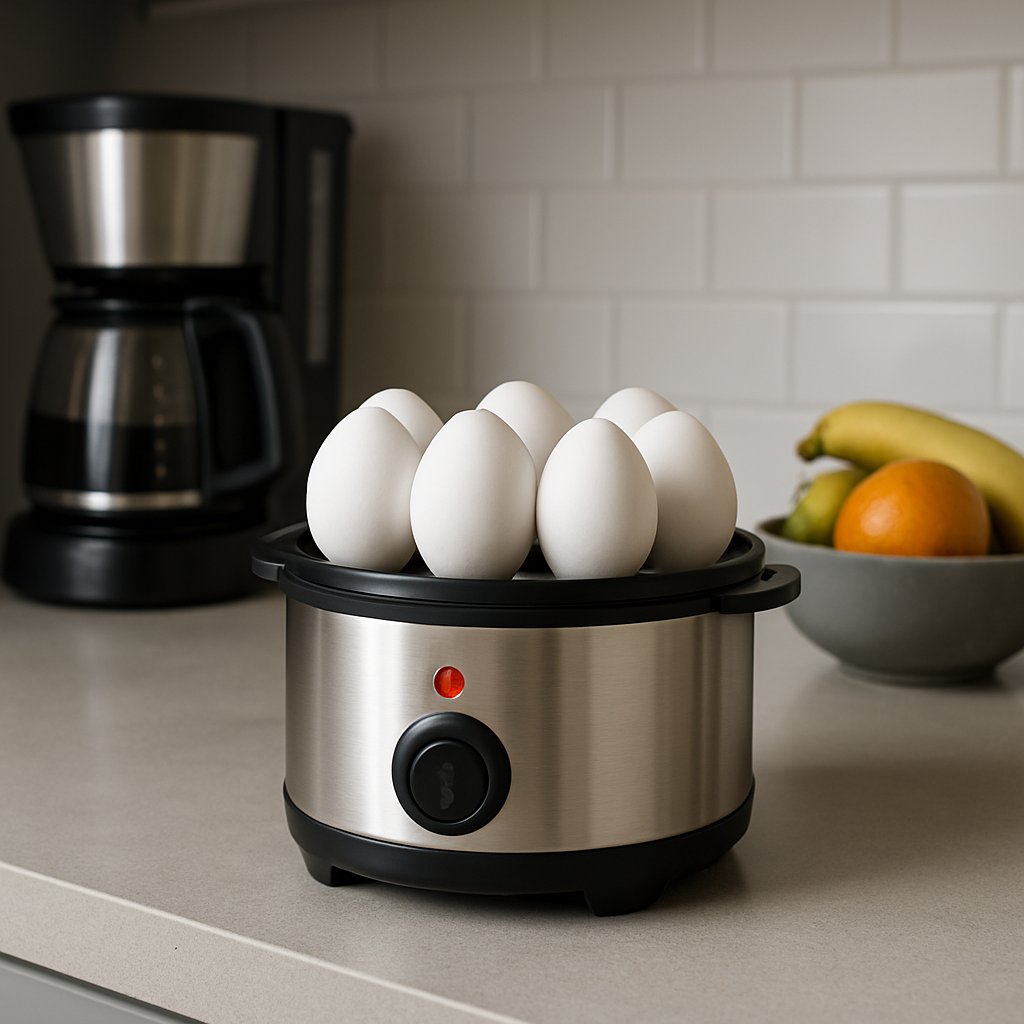
And because it’s stainless steel, you get a sturdy, rust‑free shell that looks sleek on any countertop.
Best part? You don’t have to break the bank – many models sit comfortably under $30, proving convenience doesn’t have to cost a fortune.
That price point means you can upgrade your morning routine without feeling guilty about splurging on gadgets.
So, what does a good affordable stainless steel electric egg cooker actually do?
It gently steams or boils the eggs, monitors temperature, then signals when they’re ready – all in a compact, mess‑free unit.
You’ll notice the difference the first time you slice open a perfectly set yolk that’s neither runny nor overcooked.
Plus, cleaning is a breeze – just rinse the stainless steel inner pot and you’re done.
If you love meal‑prepping, you can cook a batch of eggs in minutes, stash them in the fridge, and grab them for salads, sandwiches, or a quick snack.
And because the device uses electricity instead of stovetop heat, you free up burner space for other cooking tasks.
Feeling skeptical? Try it with a single egg first – you’ll see how consistent the results are before you commit to a full dozen.
In short, an affordable stainless steel electric egg cooker turns a daily kitchen chore into a set‑and‑forget moment, giving you more time for the things you actually enjoy.
TL;DR
The affordable stainless steel electric egg cooker lets you pop eggs in, press a button, and walk away while yolks and whites appear every time.
It saves stovetop space, costs under $30, and delivers consistent results for quick breakfasts, meal‑prep, or snack‑time without the mess, right in your kitchen everyday.
Choosing the Right Size for Your Needs
When you’re hunting for an affordable stainless steel electric egg cooker, the first question isn’t “does it work?” – it’s “how many eggs do you actually need at once?” That little sizing decision can mean the difference between a countertop hero and a space‑eating dinosaur.
Assess Your Daily Egg Consumption
If you’re a solo breakfast‑enthusiast who usually grabs one or two eggs before heading out, a tiny 4‑egg unit might feel just right. You’ll love the quick heat‑up and the fact that you can store the whole thing in a drawer.
But if you’re feeding a family of four, or you like to batch‑cook for lunches, you’ll quickly outgrow a mini‑cooker. Imagine trying to prep a week’s worth of salads and you need six hard‑boiled eggs each day – a 4‑egg model would force you into three separate cycles, wasting time and energy.
Match Capacity to Kitchen Real Estate
Counter space is premium, especially in smaller apartments. A compact 6‑inch footprint slides onto a tight countertop without hogging the burner you need for coffee. On the other hand, a larger 9‑inch model might sit comfortably on a pantry shelf when not in use.
Measure the flat area where you’d park the cooker. If you have a dedicated “egg zone” near your coffee maker, go for the larger model; if the spot is shared, the slimmer version wins.
Consider the Cooker’s Versatility
Many budget‑friendly models do more than just boil. The Dash Rapid Egg Cooker, for example, can hard‑ or soft‑boil up to seven eggs, poach two, or whip up a two‑egg omelet, all from the same stainless steel base. Its built‑in precision thermal sensor alerts you when the eggs hit the exact doneness you want, eliminating the guesswork as highlighted by Dash’s product page. If you love variety, a cooker that supports multiple cooking modes will give you more bang for your buck.
Food & Wine’s roundup notes that egg‑cooker capacities range from six to a dozen eggs, and the best‑value options sit under $20 according to their testing. Those mid‑range units often include both a poaching tray and an omelet insert, so you can switch styles without buying extra gadgets.
Budget vs. Capacity Trade‑off
Price scales with capacity, but not linearly. You can snag a 7‑egg Dash model for around $19.99, which is a steal if you regularly need more than five eggs per batch. A 12‑egg double‑decker will cost a bit more, but it also replaces the need for a separate steamer when you want to steam veggies or dumplings.
Ask yourself: will you actually fill that extra space regularly, or will it sit idle most mornings? If the latter, the smaller, cheaper unit wins the cost‑per‑use battle.
Actionable Steps to Pick the Right Size
- Count how many eggs you eat in a typical week (including snacks, salads, and meal‑prep). Multiply by 7 to get a rough monthly need.
- Check your countertop width. Subtract the space you need for a coffee maker, toaster, and any other daily appliances.
- Match that width to a cooker that handles at least 80% of your weekly egg volume.
- Verify that the model includes the cooking modes you care about (boil, poach, omelet). If you’re unsure, start with a 2‑in‑1 (boil/poach) and upgrade later.
- Read user reviews for durability of the stainless steel interior – a well‑built body will outlast cheap plastic shells.
Once you’ve narrowed it down, do a quick “test run” with a single egg. That’ll confirm the water‑measurement cup fits your countertop and that the built‑in alarm (or lack thereof) works for your routine.
Seeing the cooker in action can help you visualize how it will sit among your other gadgets.
Key Features to Look For
Alright, you’ve sized up how many eggs you need – now let’s talk about what actually makes an affordable stainless steel electric egg cooker worth your hard‑earned cash.
Stainless‑Steel Construction
First off, the body should be genuine stainless steel, not a thin metal‑coated plastic. That metal not only looks sleek, it resists rust, handles heat evenly, and survives the occasional drop onto the countertop.
Ever noticed a cheap cooker developing unsightly pink spots after a few weeks? That’s a sign the coating is failing. With solid stainless steel, the inner pot stays smooth, so eggs don’t stick and cleaning stays a breeze.
Precise Temperature Control
Temperature is the secret sauce behind perfect yolks. Look for a cooker that uses a built‑in thermal sensor rather than a simple timer. The sensor reads the water’s heat and shuts off the element the moment the eggs hit the target doneness.
Does it matter? Absolutely. A sensor‑driven unit gives you consistent soft‑boiled eggs one day and reliably hard‑boiled the next, without you having to guess minutes.
Multiple Cooking Modes
Most budget models stick to “hard” or “soft” boil, but the best value options throw in poach and omelet trays. A detachable poaching rack lets you slip two eggs into a gentle steam pocket – perfect for a quick breakfast on the go.
If you love variety, a tiny omelet insert can turn that same cooker into a mini‑frittata maker. You’ll save drawer space and avoid buying a separate pan for occasional omelet cravings.
Water‑Level Indicator
One of those little plastic cups that tells you how much water to add is more helpful than it sounds. An accurate water‑level guide ensures the steam‑cycle finishes at the right moment, preventing over‑cooked whites or under‑done yolks.
And if the cup is missing or the markings are fuzzy, you’ll end up guessing – which defeats the whole point of a “set‑and‑forget” gadget.
Automatic Shut‑Off & Audible Alarm
Safety first: the cooker should power down automatically once the cycle ends. An audible “ding” lets you hear the signal from another room, so you don’t have to hover over the device.
Some users prefer a silent model, but a gentle beep is a nice reminder that breakfast is ready – especially if you’re juggling a morning Zoom call.
Capacity That Matches Your Routine
We already talked about size, but capacity also influences feature set. A 6‑egg cooker often includes a removable tray for poaching two eggs while boiling the rest. A 12‑egg double‑deck model may add a steam basket for veggies, turning the unit into a multi‑tasking workhorse.
Think about your weekly rhythm: if you prep a batch of eggs for salads every Sunday, a larger capacity saves you from running three cycles back‑to‑back.
Ease of Cleaning
Because you’ll be handling hot water and eggs daily, the inner pot should be dishwasher‑safe or at least quick‑rinsed. Removable, non‑stick stainless steel surfaces wipe clean with a damp cloth – no scrubbing required.
Any crevices where water can hide become breeding grounds for odors, so a simple, smooth interior is a real time‑saver.
Power Consumption & Plug Type
Most affordable models draw under 500 watts, meaning they won’t spike your electric bill. Still, check that the plug fits your kitchen outlets – a European‑style plug in a US kitchen will cause unnecessary frustration.
Also, a short cord (under 2 feet) keeps the cooker close to the countertop without tangling with other appliances.
Price‑to‑Feature Ratio
Finally, weigh what you get for the price tag. A $20 unit that only boils hard eggs isn’t a great deal if you crave soft‑boiled or poached options. Look for models that pack at least three cooking modes, a reliable sensor, and stainless steel construction while staying under $30.
When the features line up, you’ll feel confident that your purchase will last months, if not years, without feeling cheap.
So, what should you keep an eye on? Scan product photos for real stainless steel, read the specs for a thermal sensor, and make sure the package includes a water‑level cup, poach tray, and an audible alarm. With those checkboxes ticked, you’re set to upgrade your egg game without breaking the bank.
Comparing Popular Models
Alright, you’ve got the basics down, so now it’s time to see how the most talked‑about affordable stainless steel electric egg cookers stack up against each other.
Dash Rapid Egg Cooker
This little 7‑egg machine is a crowd‑pleaser because it throws in a poaching tray and an omelet insert for the price of a basic boiler. The stainless‑steel inner pot stays cool enough to handle, and the built‑in sensor shuts off the element the moment the water reaches the right temperature.
What I love? The “one‑button” simplicity – you just add water, drop the eggs, and press go. The downside is the cord is a bit short, so you need to keep it close to an outlet.
Hamilton Beach 6‑Egg Electric Egg Boiler
Hamilton Beach keeps things ultra‑minimalist: boil or soft‑boil, no frills, but the stainless‑steel construction feels solid. It draws about 450 W, so it won’t hike your electricity bill.
If you’re only after hard‑boiled eggs and don’t need poaching, this model’s a sweet deal at under $20. On the flip side, you won’t get an audible alarm – you have to watch the timer.
Cuisinart Egg Cooker (7‑Egg Capacity)
Cuisinart leans into premium feel with a brushed stainless‑steel finish and a detachable poaching rack. The temperature sensor is a bit more precise, which translates to consistently fluffy omelets.
The price tags around $30, so it’s still affordable, but the larger footprint might crowd a tiny countertop. Also, the water‑level cup is a separate plastic piece that can feel cheap.
So, which one fits your kitchen vibe? Do you need the extra poaching option, or is a no‑nonsense hard‑boil enough?
Quick Comparison Table
| Model | Capacity | Key Extras | Price (USD) |
|---|---|---|---|
| Dash Rapid Egg Cooker | 7 eggs | Poach tray, omelet insert, audible alarm | ≈ $19 |
| Hamilton Beach Egg Boiler | 6 eggs | Simple boil/soft‑boil, compact cord | ≈ $15 |
| Cuisinart Egg Cooker | 7 eggs | Precision sensor, brushed steel, detachable poach rack | ≈ $30 |
Notice how the price gap isn’t huge, but the feature set can change your daily routine. If you love a quick poached egg for a salad, the Dash or Cuisinart will save you a separate pan. If you’re just prepping a batch of hard‑boiled eggs for snack packs, the Hamilton Beach does the job without any extra bells.
Another thing to watch is the water‑level indicator. All three models include a plastic cup, but the Dash’s markings are laser‑etched, so they don’t wear off after a few washes. The Hamilton version uses faint printed lines that can fade, and the Cuisinart’s cup is removable but feels a bit flimsy.
And what about cleaning? The stainless‑steel inner pots on all three are dishwasher‑safe, but the Dash’s removable poach tray has tiny ridges where water can hide – a quick rinse helps avoid odors. The Hamilton’s plain pot is the easiest to wipe down, while Cuisinart’s brushed finish can show water spots if you don’t dry it.
Finally, think about power consumption. They all sit under 500 W, but the Cuisinart’s sensor runs a tad longer to fine‑tune the temperature, which might add a minute or two to the cycle. That’s a small trade‑off for that extra consistency.
Bottom line: if you want the most bang for your buck and a bit of versatility, the Dash Rapid Egg Cooker is a solid pick. If you’re a strict budget shopper who only needs hard‑boiled eggs, the Hamilton Beach model wins on simplicity and price. And if you don’t mind spending a few extra dollars for a premium feel and a more precise sensor, the Cuisinart rounds out the trio.
Take a minute to list the features you actually use – poach, omelet, or just boil – and match them to the table. You’ll end up with a cooker that feels tailor‑made for your morning routine.
Maintenance and Longevity Tips
Alright, you’ve got your affordable stainless steel electric egg cooker humming away, but what happens when the novelty wears off? Do you let it gather a layer of grime or treat it like a kitchen sidekick that deserves a little TLC?
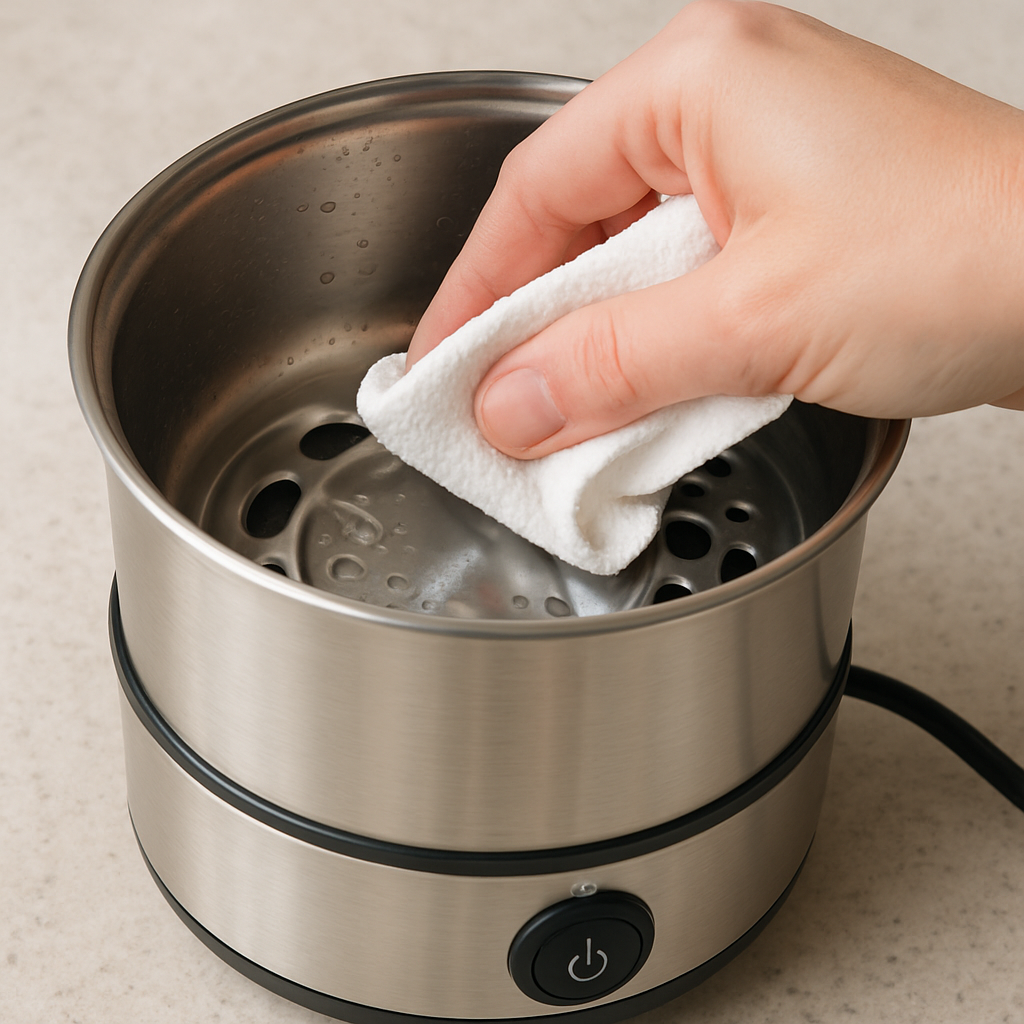
Cleaning the inner pot without the hassle
The stainless‑steel inner pot is the star of the show – it’s where the magic happens and where most of the mess sticks.
After each batch, give it a quick rinse under warm water and wipe it with a soft sponge.
Because the surface is non‑stick, you’ll rarely need more than a swipe.
If you’re the type who likes to dump the whole thing in the dishwasher, most budget models are safe, but the dishwasher’s high heat can dull the shine over time.
A hand wash preserves the luster and keeps the water‑level cup from warping.
One tip that saved me a lot of frustration: dry the pot immediately after cleaning. Water spots are a nuisance on brushed steel and can make the cooker look older than it is.
Keeping the sensor accurate
The thermal sensor is the brain that tells you when the eggs are perfect.
Dust, mineral buildup, or a splash of water can throw it off.
Every few weeks, wipe the sensor area with a dry, lint‑free cloth – no need for chemicals.
And here’s a little secret from a real‑world review: the Cuisinart model’s sensor ran a bit longer at first because users weren’t following the pierce‑the‑egg step, which caused water to spill and the sensor to over‑compensate according to a detailed Cuisinart egg cooker review. A quick pierce and rinse after each use solves that problem and keeps the cycle snappy.
Storing it right
When you’re not using the cooker, keep it in a dry spot where the cord isn’t twisted.
A short, tidy cord prevents the plug from fraying, which can be a safety hazard.
If you have limited counter space, consider a dedicated shelf or a kitchen drawer with a silicone mat.
The mat cushions the cooker and catches any stray water droplets that might escape during cleaning.
Preventing rust and corrosion
Even though stainless steel resists rust, leaving the unit in a humid environment for weeks can invite oxidation.
Wipe the exterior dry, especially around the base where moisture can pool.
For extra peace of mind, give the underside a light spray of food‑grade mineral oil once a year.
It’s a trick chefs use on their pans, and it adds a thin barrier that keeps the metal looking new.
Troubleshooting common hiccups
Ever noticed the cooker taking a minute longer than usual? Check the water‑level cup – the markings can fade, and a mis‑measurement means the steam cycle runs longer.
If eggs start cracking mid‑cycle, they’re probably hitting the bottom of the pot.
A thin layer of water at the base cushions them, so add just enough to cover the heating element but not so much that it splashes.
And if the audible alarm is silent, it might be a loose speaker.
Gently tap the side of the unit; you’ll often hear a faint click as it settles back into place.
Quick maintenance checklist
- Rinse and dry the inner pot after each use.
- Wipe the sensor with a dry cloth every 2‑3 weeks.
- Inspect the water‑level cup for faded markings.
- Store in a dry, cord‑free spot.
- Apply a light coat of mineral oil to the exterior once a year.
Following these simple steps means your affordable stainless steel electric egg cooker will keep delivering perfectly peeled eggs for years, instead of becoming another forgotten gadget on the back of the pantry.
Where to Buy and What to Expect
So you’ve narrowed down the features and you’re ready to actually purchase an affordable stainless steel electric egg cooker – exciting, right? The first thing to figure out is where you’ll find a model that checks all the boxes without breaking the bank.
Online marketplaces vs. brick‑and‑mortar stores
Amazon, Walmart.com, and Target’s online shop all carry the popular 6‑egg Krups “Simply Eggs” unit, plus a handful of lesser‑known brands that sit under $30. Buying online gives you instant access to user reviews, price‑matching tools, and free shipping if you’re a Prime member.
If you prefer to see the cooker in person, head to the kitchen‑appliance aisle of your local big‑box retailer. You can flip the lid, feel the stainless‑steel weight, and even test the button feel before you commit. Plus, many stores let you return it within 30 days if the water‑level cup is fuzzy or the alarm sounds off.
Do you have a favorite local hardware store? Some of them stock seasonal “small‑appliance” sections where you might snag a discount bundle that includes an omelet tray or a poaching rack.
What to look for in the product listing
When you’re scrolling, keep an eye on three things: capacity, cooking modes, and the presence of a stainless‑steel inner pot. The Krups model, for example, offers soft, medium, and hard‑boiled options plus omelet and poached accessories, all in a compact 6‑egg footprint according to the manufacturer’s spec sheet. If a listing only mentions “hard‑boil,” you’re probably looking at a cheaper plastic‑cased version that won’t last as long.
Also, scan the photos for the water‑level measuring cup. Clear, laser‑etched markings are a good sign; faded ink means you’ll be guessing water amounts after a few washes, which defeats the set‑and‑forget promise.
Price‑to‑feature sanity check
It’s tempting to chase the lowest dollar figure, but remember that a $15 unit with a flimsy plastic body will likely need replacement in a year. A $20‑$25 stainless‑steel model typically includes an audible alarm, automatic shut‑off, and a detachable poaching tray – features that add real convenience.
Here’s a quick checklist you can print out before you click “Add to Cart”:
- Stainless‑steel inner pot (no plastic coating).
- At least two cooking modes (soft/hard or poach).
- Water‑level cup with durable markings.
- Automatic shut‑off and audible alert.
- Warranty of 1 year or more.
If the product page ticks all five, you’re probably getting good value for the price.
Shipping, returns, and warranty basics
Most online sellers bundle free standard shipping for orders over $25, which is handy because the cooker itself is a bit bulky. When the package arrives, inspect the lid seal and the accessories before you even open the box – any missing piece is easier to claim within the return window.
Warranty coverage is another hidden cost saver. The Krups cooker comes with a one‑year warranty that covers manufacturing defects, and the same applies to most reputable brands in the $20‑$30 range. Keep the receipt and the original packaging; you’ll need both if you ever have to send it back.
What to expect on day one
Unbox, rinse the inner pot, and read the quick‑start guide. You’ll usually fill the measuring cup to the “soft” line for a run‑time of about 5‑6 minutes, place the eggs, press the single button, and walk away. The alarm will ping when the water has evaporated and the cooker has shut off automatically.
If the alarm is silent, double‑check that the speaker isn’t covered by a stray piece of foil – a common oversight that can be fixed in seconds.
Finally, give the cooker a test run with one egg. This helps you gauge how much water you actually need on your specific countertop and lets you verify that the timer matches the doneness you prefer.
Now that you know where to hunt, what to scrutinize, and how the first cycle feels, you’re set to add a reliable, affordable stainless steel electric egg cooker to your kitchen arsenal without any nasty surprises.
Energy Efficiency and Cost Savings
When you think about the kitchen gadget you just added, the first thing that comes to mind is usually convenience. But what if I told you that the affordable stainless steel electric egg cooker is also a quiet hero for your electricity bill?
Why electricity beats the stovetop
Stovetop burners are hungry. A typical 2‑kW electric coil can run for ten minutes just to bring a pot of water to a boil, and most of that heat never reaches the eggs – it escapes into the air. An egg cooker, on the other hand, uses a dedicated heating element that sits directly under a small water reservoir, often under 500 watts.
That means you’re using roughly a quarter of the power of a full‑size burner for the same job. Over a month of daily breakfasts, the savings add up to a few extra dollars – enough to treat yourself to a better coffee bean.
Batch cooking = less energy per egg
One of the smartest ways to stretch that efficiency is to cook in batches. The larger 7‑ or 12‑egg models let you steam a dozen eggs in a single five‑minute cycle. Compare that to boiling a pot of water, tossing in a handful of eggs, waiting for it to come back to a boil, then repeating – you’ve basically multiplied the energy waste.
Think about it this way: each extra egg you add doesn’t cost you another minute of heat. The cooker’s sensor shuts off the element the moment the water’s turned to steam, so the extra eggs ride that steam for free.
Real‑world cost comparison
Let’s do a quick mental math. A 500‑watt cooker running for six minutes uses 0.05 kWh (500 W × 0.1 h). At the national average of $0.13 per kWh, that’s less than a cent per batch. Even if you run it twice a day, you’re still under $1 a month.
Now look at a 2‑kW burner doing the same job for ten minutes. That’s 0.33 kWh, or about 4 cents per use. Two daily cycles push you toward $12‑$15 a year – a noticeable gap if you’re budgeting tightly.
Heat‑up time matters
Because the water volume in the cooker is tiny, it reaches steaming temperature in under a minute. No waiting for a big pot to boil, no lingering heat on the countertop. That rapid heat‑up not only saves energy, it also frees up your stove for other tasks – think coffee, toast, or a quick sauté while the eggs finish.
Tips to squeeze every watt
- Use the exact water‑level cup that comes with the cooker. Too much water means a longer steam cycle; too little can cause the element to overheat.
- Keep the cooker’s base clean and free of mineral buildup. A dirty heating element has to work harder, pulling more power.
- If you’re prepping for the week, set a timer for a single large batch on Sunday. You’ll have ready‑to‑go boiled or poached eggs all week without ever turning on the stove again.
- Store the cooker with the cord untangled and away from moisture. A short, tidy cord prevents accidental trips to the outlet that could interrupt the cycle.
Environmental angle
Beyond the dollars, there’s a subtle environmental win. Less electricity means a smaller carbon footprint, especially if your grid relies on fossil fuels. While an egg cooker won’t replace major appliances, the cumulative effect of swapping out a stovetop boil for a dedicated, low‑power unit is a step toward a greener kitchen.
So, next time you reach for that stainless steel egg cooker, remember it’s doing more than perfect eggs. It’s quietly trimming your energy use, keeping your wallet a little fuller, and giving the planet a tiny break. And that, my friend, is a win worth cracking.
Conclusion
So there you have it – the affordable stainless steel electric egg cooker isn’t just a gimmick, it’s a tiny time‑saver that actually fits into real lives.
When you sized the capacity, checked the sensor, and gave the stainless‑steel body a quick wipe, you already set yourself up for consistently perfect yolks without the stovetop drama.
Remember that extra watt‑saving we talked about? Those pennies add up, and the tiny carbon‑footprint boost feels good on a busy morning.
What’s the next step? Grab the model that matches your weekly egg count, run a one‑egg test to nail the water level, then batch‑cook for the week – you’ll never scramble for a timer again.
If you’re still on the fence, think about the hassle of cleaning a pot, the space it hogs on the burner, and the guesswork of timing. The cooker eliminates all three, letting you focus on the coffee, the toast, or whatever else matters.
So go ahead, add that sleek stainless‑steel unit to your cart, give it a spin, and enjoy the quiet confidence of knowing breakfast is taken care of.
And the best part? You won’t have to keep checking a pot or guess when the timer dings – the built‑in alarm does it for you, leaving your hands free for that morning text or a quick scroll through the news.
FAQ
What makes an affordable stainless steel electric egg cooker worth buying?
Because it gives you consistent results without blowing your budget. The stainless‑steel body conducts heat evenly, so you get perfectly boiled, soft‑boiled, or poached eggs every time. It also resists dents and rust, lasting longer than cheap plastic units. Add a built‑in sensor and an audible alarm, and you’ve got a set‑and‑forget gadget that actually saves you time and energy.
How do I choose the right capacity for my household?
Start by counting how many eggs you eat in a typical week – include snacks, salads, and meal‑prep. If you’re solo or a couple, a 4‑ to 6‑egg model usually covers daily needs. Families or batch‑cookers benefit from 7‑ to 12‑egg units, because one cycle will handle a week’s worth of breakfast or lunch prep. Match the footprint to your counter space, too.
Can I use the cooker for poaching or making omelets?
Most budget‑friendly models include a detachable poaching tray and a tiny omelet insert. Slip two eggs into the poach rack for a quick, hands‑off poached breakfast, or pour a beaten mixture into the omelet tray for a fluffy mini‑frittata. If a model only lists “hard/soft boil,” you’ll miss out on that versatility, so check the accessories list before you click “add to cart.”
How much energy does it actually save compared to the stovetop?
Typical egg cookers run under 500 watts and need only five to six minutes to steam a batch. A 2‑kilowatt electric burner can take ten minutes just to bring a pot of water to a boil. That difference translates to roughly 0.05 kWh per batch versus 0.33 kWh on the stove – a few pennies saved each morning that add up over months.
Is the stainless steel interior really rust‑proof and easy to clean?
Stainless steel resists corrosion, but it’s not invincible. Rinse the inner pot right after each use and dry it with a soft cloth to avoid water spots. A quick wipe with mild dish soap removes any egg residue; you don’t need a scrub brush. If you ever notice pink staining, that’s a sign the coating is failing, and it’s time to replace the unit.
What should I look for in the water‑level measuring cup?
The cup is your recipe for steam time. Look for laser‑etched or engraved markings that won’t fade after a few washes. Clear, precise lines let you add just enough water for soft, medium, or hard‑boiled settings without guesswork. If the cup is flimsy plastic with printed ink, you’ll end up over‑ or under‑cooking the eggs, which defeats the whole “set‑and‑forget” promise.
What’s the best way to troubleshoot common problems like a silent alarm or cracked eggs?
If the alarm never sounds, first make sure the speaker isn’t covered by a foil wrapper or the cord’s plug. A gentle tap on the side can reseat a loose speaker. Cracked eggs usually mean they’re hitting the bottom of the pot; add a thin layer of water before starting the cycle to cushion them. Finally, double‑check the water‑level cup – faded markings can lengthen the steam cycle and cause odd behavior.
